PRODUCTS SEARCH
Installing a centrifugal pump correctly is far more than a mechanical task—it is the foundation for long-term reliability, efficiency, and cost control. Whether you are working with a centrifugal water pump in industrial systems or commercial applications, the reality is simple: most pump failures are not caused by design flaws, but by improper installation.
In fact, studies and field experience consistently show that up to 90% of pump issues originate from installation errors. A properly installed pump can reduce downtime by nearly 40%, extend service life by 5–10 years, and significantly lower maintenance costs.
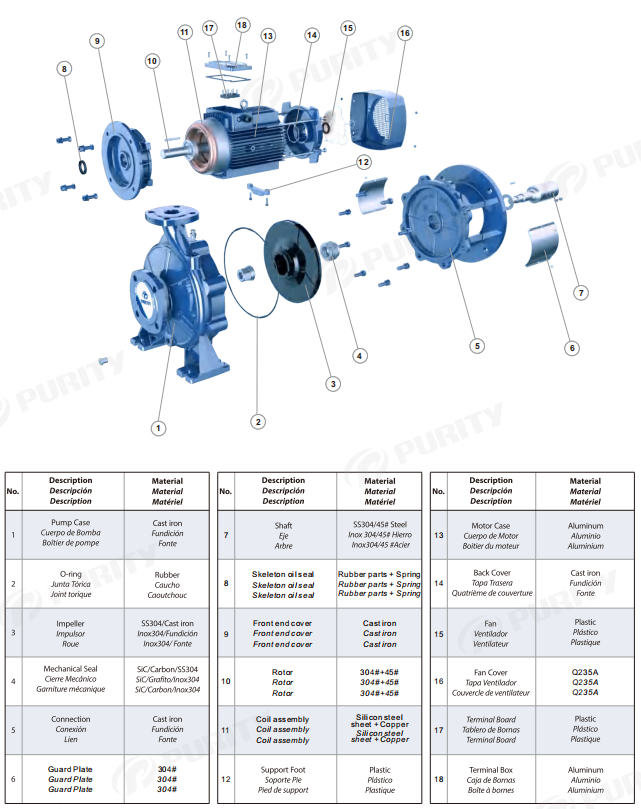
A centrifugal pump operates on a simple principle: a rotating centrifugal pump impeller transfers energy to the fluid through centrifugal force. Key centrifugal pump parts include:
(1)Impeller
(2)Pump casing
(3)Shaft and bearings
(4)Mechanical seal
(5)Motor
These centrifugal pump components are structurally simple—but highly sensitive to installation conditions. The pump’s reliability depends less on complexity and more on precision.
At its core, installing a centrifugal pump is about controlling two critical systems:
This ensures the physical integrity of the system:
(1) Foundation strength and levelness
A rigid, level base prevents vibration and structural deformation.
(2) Precise alignment (pump & motor)
Misalignment leads to bearing wear, seal failure, and energy loss.
(3) Stress-free piping connection
Pipes must not impose external force on the pump casing.
Result: Reduced vibration, minimized wear, and longer equipment life.
This ensures proper fluid behavior:
(1) Continuous upward suction piping
Prevents air pockets from forming.
(2) No air traps in the system
Even small amounts of air can disrupt operation.
(3) Proper priming before startup
The pump must be fully filled with liquid.
Result: Prevention of cavitation, dry running, and loss of suction.
✔️ In essence:
Mechanical stability + hydraulic continuity = reliable pump operation
A standardized, engineering-based process is essential. Avoid relying on experience alone.
Review technical documents and drawings
Ensure safety procedures are in place
Prepare tools and lifting equipment
Check all centrifugal pump parts for damage
Verify impeller rotation direction
Confirm completeness of components
Construct a solid concrete base
Ensure proper leveling and curing
Install pump and motor
Perform precise shaft alignment (laser recommended)
Install suction and discharge piping
Ensure proper support to avoid pipe stress
Design suction line to eliminate air pockets
Connect motor wiring according to specifications
Verify voltage and protection systems
Fill the pump completely with liquid
Remove all trapped air
Start the pump gradually
Monitor vibration, noise, and flow performance
One of the most overlooked issues in centrifugal pump installation is air.
Air can enter or remain in the system due to:
Improper suction pipe slope
High points in piping
Incomplete priming
Consequences include:
Loss of suction
Cavitation damage
Inability to self-prime
In many cases, what appears to be a “pump failure” is actually a fluid design issue.
Most failures are preventable. The most frequent errors include:
Poor alignment → vibration and bearing damage
Weak foundation → instability
Incorrect piping → stress and air blockage
No priming → dry running and seal failure
Conclusion:
Installation errors are human-controlled risks—and entirely avoidable.
Installation does not end at startup. Proper operation ensures long-term success:
Daily checks: vibration, noise, leakage
Periodic maintenance: lubrication, seal inspection, alignment verification
Well-maintained pumps can last 3–5 times longer than poorly maintained ones.
The Purity PSTF centrifugal water pump is designed to simplify both installation and maintenance:
(1) Back pull-out design
Allows easy maintenance without removing piping, reducing downtime.
(2) KTL-coated cast components
Provide superior corrosion resistance and extended service life.
(3) Multiple impeller material options
(Cast iron, bronze, stainless steel) for diverse applications.
(4) Optimized hydraulic design
Ensures high efficiency and stable performance.
These advantages make PSTF an ideal choice for users seeking reliability and ease of installation.
PSTF Installation Video:https://www.youtube.com/watch?v=XNxnF2ieufA

Picture | Purity Split-Case Centrifugal Pump (PSTF)
Installing a centrifugal pump is not just about assembling equipment—it is about controlling precision and fluid behavior.
Follow standardized procedures, eliminate air risks, and choose well-designed equipment like the Purity PSTF series—and your centrifugal pump system will deliver reliable, long-term performance.